
"Warped Plywood", or "How to Build an Instrument Service Pad From Scrap", Part 1
The impetus for this article came about from a scrap piece of shag carpet that I'd collected and the happenstance of some pieces of plywood that were slightly bent but that were workable and that came my way in the past 30 days or so.
"Huh?", is what I hear you saying in your head right now.
Let's take a step back. In the process of building a business that mostly centers around renting out older tube amps, it follows that we also work on our own personal electric instruments. At the end of the day, we don't just love heavy music, we love playing it.
Part of working on electric instruments properly is making sure that you have the appropriate tools and have a workspace that's set up to do so. If you're going to work on electric guitars and basses, if you're going to work on an occasional drum, or pedal, or amp, or speaker cabinet, you have to make sure that, like the Hippocratic Oath, first you do no harm. If you get good enough at luthiery, and people ask you for setups, fixes, and repairs, you need to be doubly sure that instruments that come into your care are not damaged as a result of your handling of them. Damage really should only come through practice, rehearsals, and shows. Damage from assembly or repair isn't "relicing", it's negligence. (no, we don't believe in relicing!)
To advance on these goals, we're going to need some kind of instrument service pad in order to be able to work on instruments without scratching, scraping, or dinging them. That's why I saved the carpet scrap. Putting together a board with that carpet on it is just the sort of thing that we need to make this happen. (Plus I wanted a new, better, instrument service pad for myself, and I wanted to be able to illustrate some of these principles for you.)
We've seen videos of instrument setup tips, and in some of those cases, we've seen guitar bodies put directly on that hard tables! It's cringe-inducing to watch and entirely preventable.
But this article isn't about pointing a finger at others and screaming "WRONG!". In another article we'll describe what we do on setting up our workbench and present our ideas and show what we do. You might want to incorporate some of these ideas into your own workbench and practices. We hope to be able to help you work more easily on your own instruments, and do so with greater ease of mind.
That was a pretty big lead up into this particular project: Currently what we're doing is using some scrap pieces of plywood and gluing them up to make a convenient pad for servicing our. and our friends, and customers' instruments
We'll start by building out the larger board while straightening for the warp in the smaller scrap boards.
How Plywood Is Made: Getting the Wood
So first we need to describe how plywood is made. Plywood doesn't "come from nowhere", obviously, but it's not obvious where it does comes from. Fortunately for us, it comes from wood! Here's how it happens:
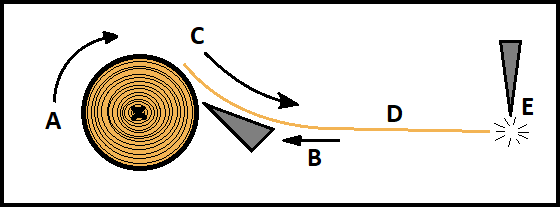
A: A log is put into a machine built to secure and spin logs along the length of their trunks.
B: A long blade is pressed up against the log. The long blade begins cutting into the log, first shaving off the bark, making the log uniformly thick, and then shaving off a thin layer of wood.
C: The blade continues to press against the log, shaving off the thin layer of wood until only a small, round dowel that can be shaved no further remains.
D: The shaved wood travels down a conveyor for flattening and then cutting into sheets that will be layered to form into the plywood.
E: Another blade cuts the shaved wood layer (now called a "ply") at regular intervals. The plies are then fed into the next process for gluing into plywood.
How Plywood Is Made: Forming the Plies (Layers)

F1: Depending on whether the wood in the plywood layers was gotten from the outer edge of the log,
F2: Or near the center of the log, the amount of bowing will be, in part, based on how tight the "ring" of wood that was shaved off the log.
G: When done correctly, plywood is most often assembled from layers of not only alternating bows, but alternating grain directions. This is what makes plywood stronger than regular wood for its given thickness. This means that most of the issues with the plywood "bowing" can be properly addressed by alternating "the bows" or, the natural stresses that have grown into the wood.
H: But with the vagaries of manufacturing being what they are, and trees not growing 100% the way we expect, and with things not always conforming 100% to specifications, plies aren't always glued together the way they're supposed to, and even when they they are glued properly, reality happens...
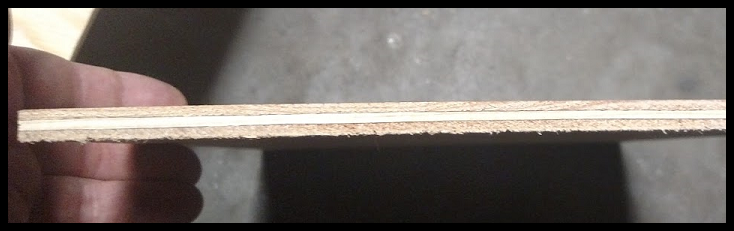
And so you end up getting a bowed piece of plywood, or many bowed pieces of plywood, like mine, here...
In the next couple of days, we'll address what you can do (what we did) to handle the problems with the bow, and we'll finish putting together our instrument service pad!
Update: 31-Oct-2018
Look at what we found!
The pictures!